Download the FREE Ebook
Short on time? Download the Ebook version of this post and get exclusive access to more content, Free webinars, and much more!
Imagine the longest, most stressed-filled day you’ve ever had at work in the last five years.
Maybe you arrived at the office early and your day got derailed with meetings, or maybe you were under a strict deadline and had to stay at the office so late that you weren’t able to have dinner with the family, put your kids to bed, or even see your spouse.
Many professionals sacrifice their most valuable asset, time, in hopes of getting more work done. We’ve all been there; the “I can do it all” mindset gets the better of us.
This mindset doesn’t always work because there seems to be a relentless downpour of tasks to do, projects to complete, meetings to attend, and fires to put out.
The perfect recipe for overwhelm, stress, and eventual discontent.
I have good news for you though; Excel has a tool built in specifically to help you automate your tasks, so that you can save time and earn more freedom to work on interesting projects or get home in time for dinner. This tool is called Visual Basic for Applications comes in (VBA). If you don’t know what VBA is, stay tuned because your socks are about to be blown right off!
What is VBA?
VBA is a programming language built into Microsoft Excel that allows you to “record” specific actions like keystrokes, cell formatting changes, formulas, etc. Excel is then able to repeat those actions, automatically, for as long as you need them.
The Macro is the name we give the instructions we write using VBA.
It’s like having a robot and being able to teach it a specific set of instructions to executing a task in Excel. Imagine, you could leave your robot working on that stupid sales forecast that nobody ever looks at while you go out for a quick doughnut run.
…this guy has the right idea
You can literally perform dozens of monotonous tasks, such as formatting downloaded data or updating the pivot tables, in just a few clicks, turning hours of work into minutes of automation.
Not only will VBA help you save time and energy, but being familiar with it and putting it on your resume will instantly put you in a class of your own, at least in the eyes of hiring managers.
You’ve heard me mention in previous blog posts that these days everyone and their goldfish puts “Excel skills” on their resume. This makes it much harder for people like you and I who actually know a thing or two about Excel because it commoditizes the skill.
VBA is different though; this is not a skill you can easily fake or exaggerate. You can list out a couple of Excel formulas you learned in college and sound smart, but try that with VBA and you’ll instantly become donkey of the day.

Putting this in your resume and being able to demonstrate your VBA knowledge in a job interview, could potentially give you the edge you need over other job candidates , and at the same time give you leverage to negotiate for more money. That’s right… MORE MONEY!
Before we dive in to the material…
Have questions? Need some help? I’m here for you…
You can reach out to me on FaceBook, where you can ask me anything, interact with other like-minded people who are committed to improving their careers, and share useful information with me and each other.
I am committed to helping you make the most of your career!
Without further ado, let’s dive in!
Recording Macros
What is the Macro Recorder?
The Macro Recorder is one of the easiest ways to get started with VBA and doesn’t require any coding knowledge. If you don’t know what the Macro Recorder is, imagine a game of “Simon Says” in Excel. You copy and paste a few cells, format a few others, and enter a formula. Now it’s Excel’s turn to mirror your actions, and in a flash the application executes everything you just did with ease.
That’s essentially how the Macro Recorder works. You lead and it follows, repeating every action you take and executing on them.
How to Record Your First Macro
Recording your first Macro is very easy:
Step 1: Activate the Developer Tab
Things become infinitely easier once you activate this tab. Also, others are impressed when they see you have an extra tab that they don’t in Excel. Wear it like a badge of honor…
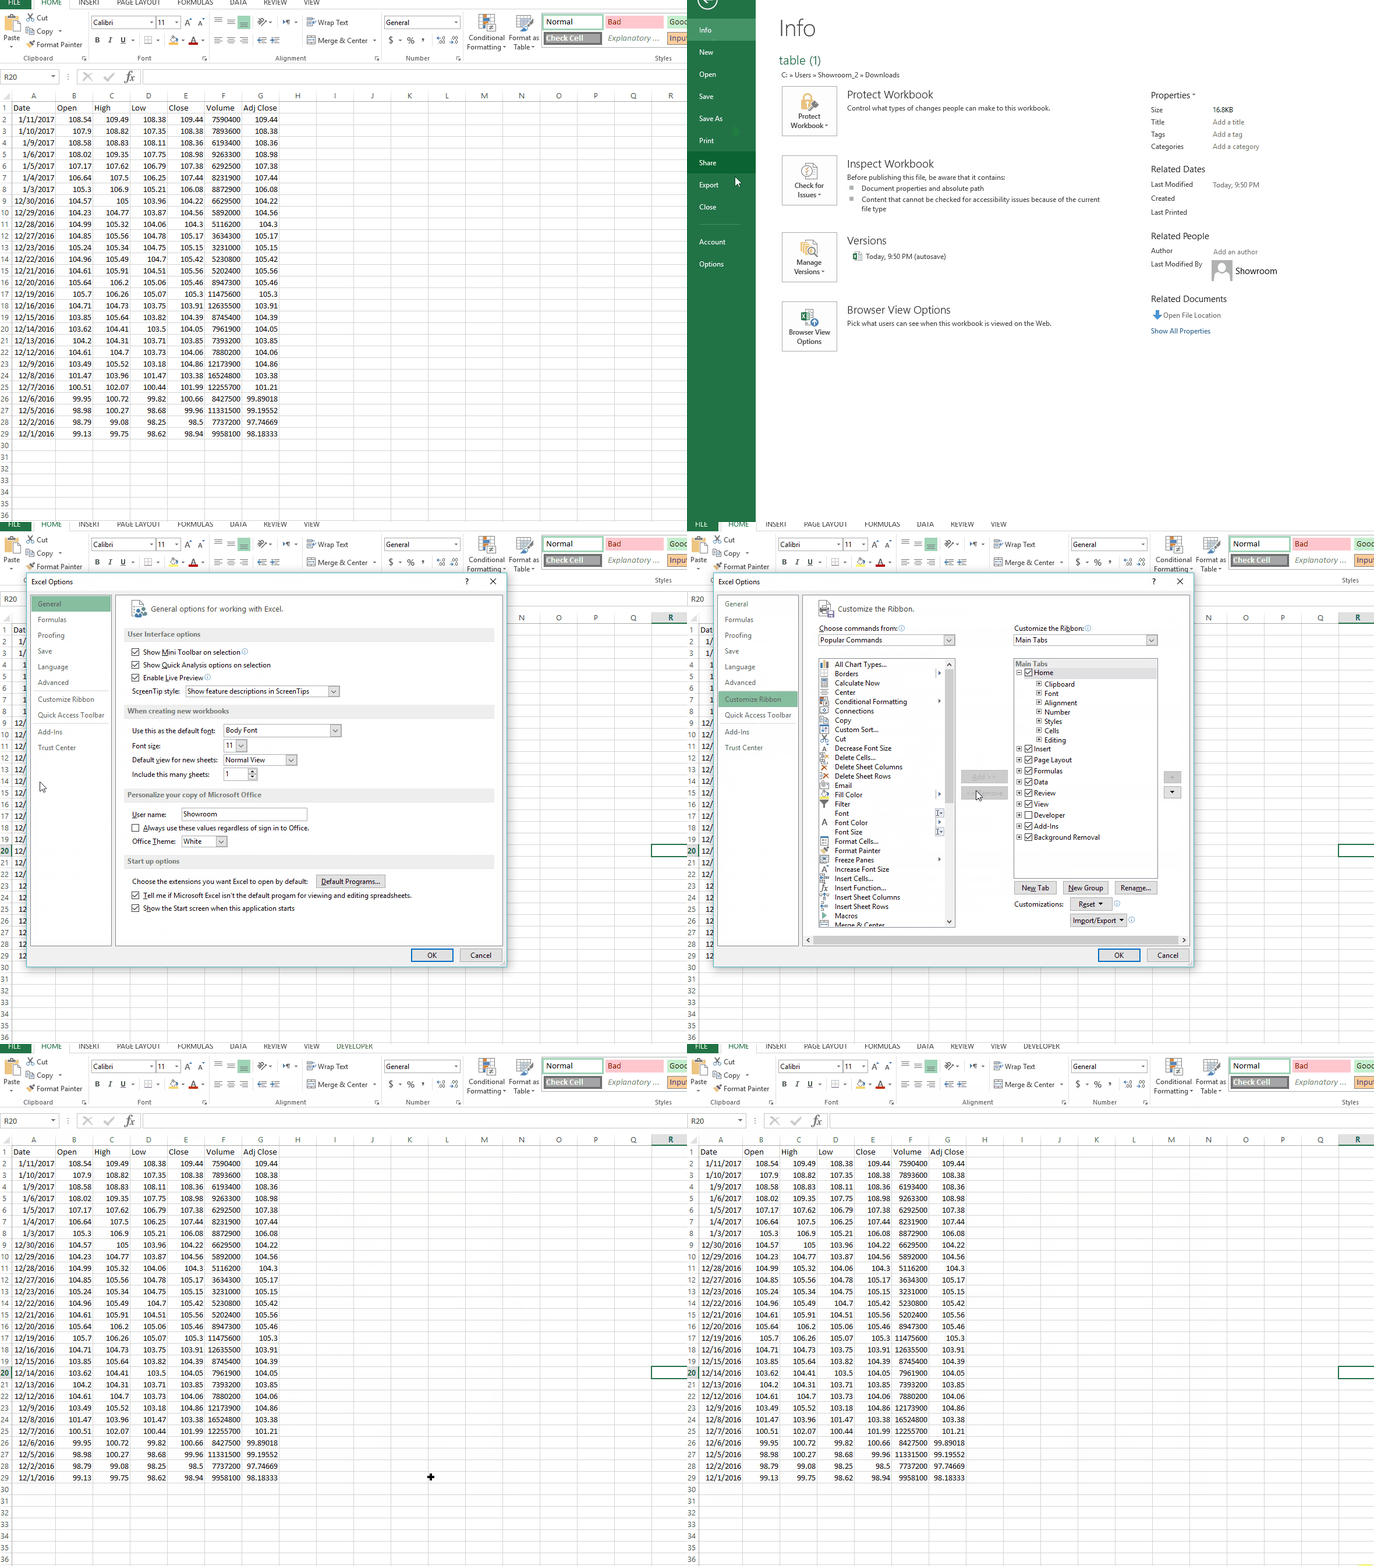
Step 2: Navigate to the Developer tab and click on “Record Macro”

Step 3: Name your Macro and assign a Keyboard shortcut

Step 4: Start Recording!
Every action you take in Excel is now being recorded by the Macro Recorder. Once you’re done, Excel will be ready to execute every action you took over and over, 100 times faster!
Just remember to hit “Stop” on the recorder once you’re done!

I demonstrate the power of recording Macros in the next two GIFs….
In the first one, I am formatting a table to my liking. Very fancy, right? Yeah, it’s also time consuming as heck!
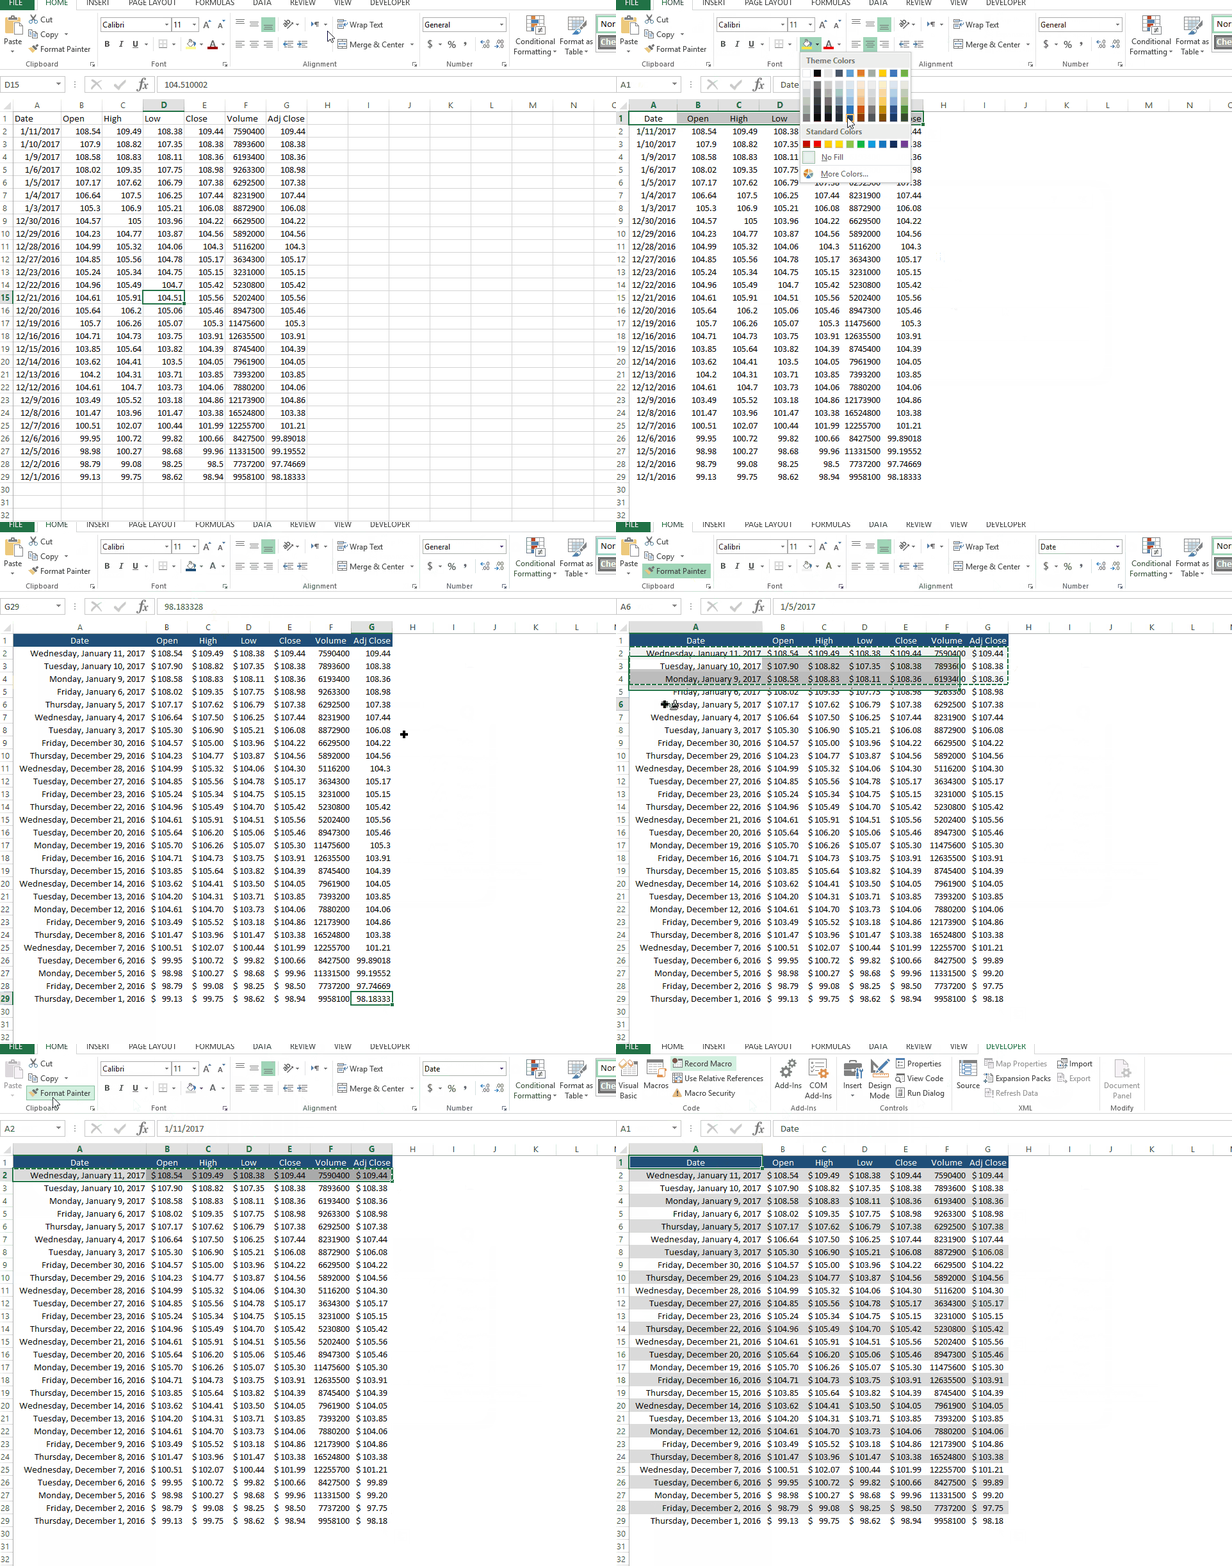
See below how quickly the Macro executes my fancy formatting. I’d say about a second… and that’s conservative
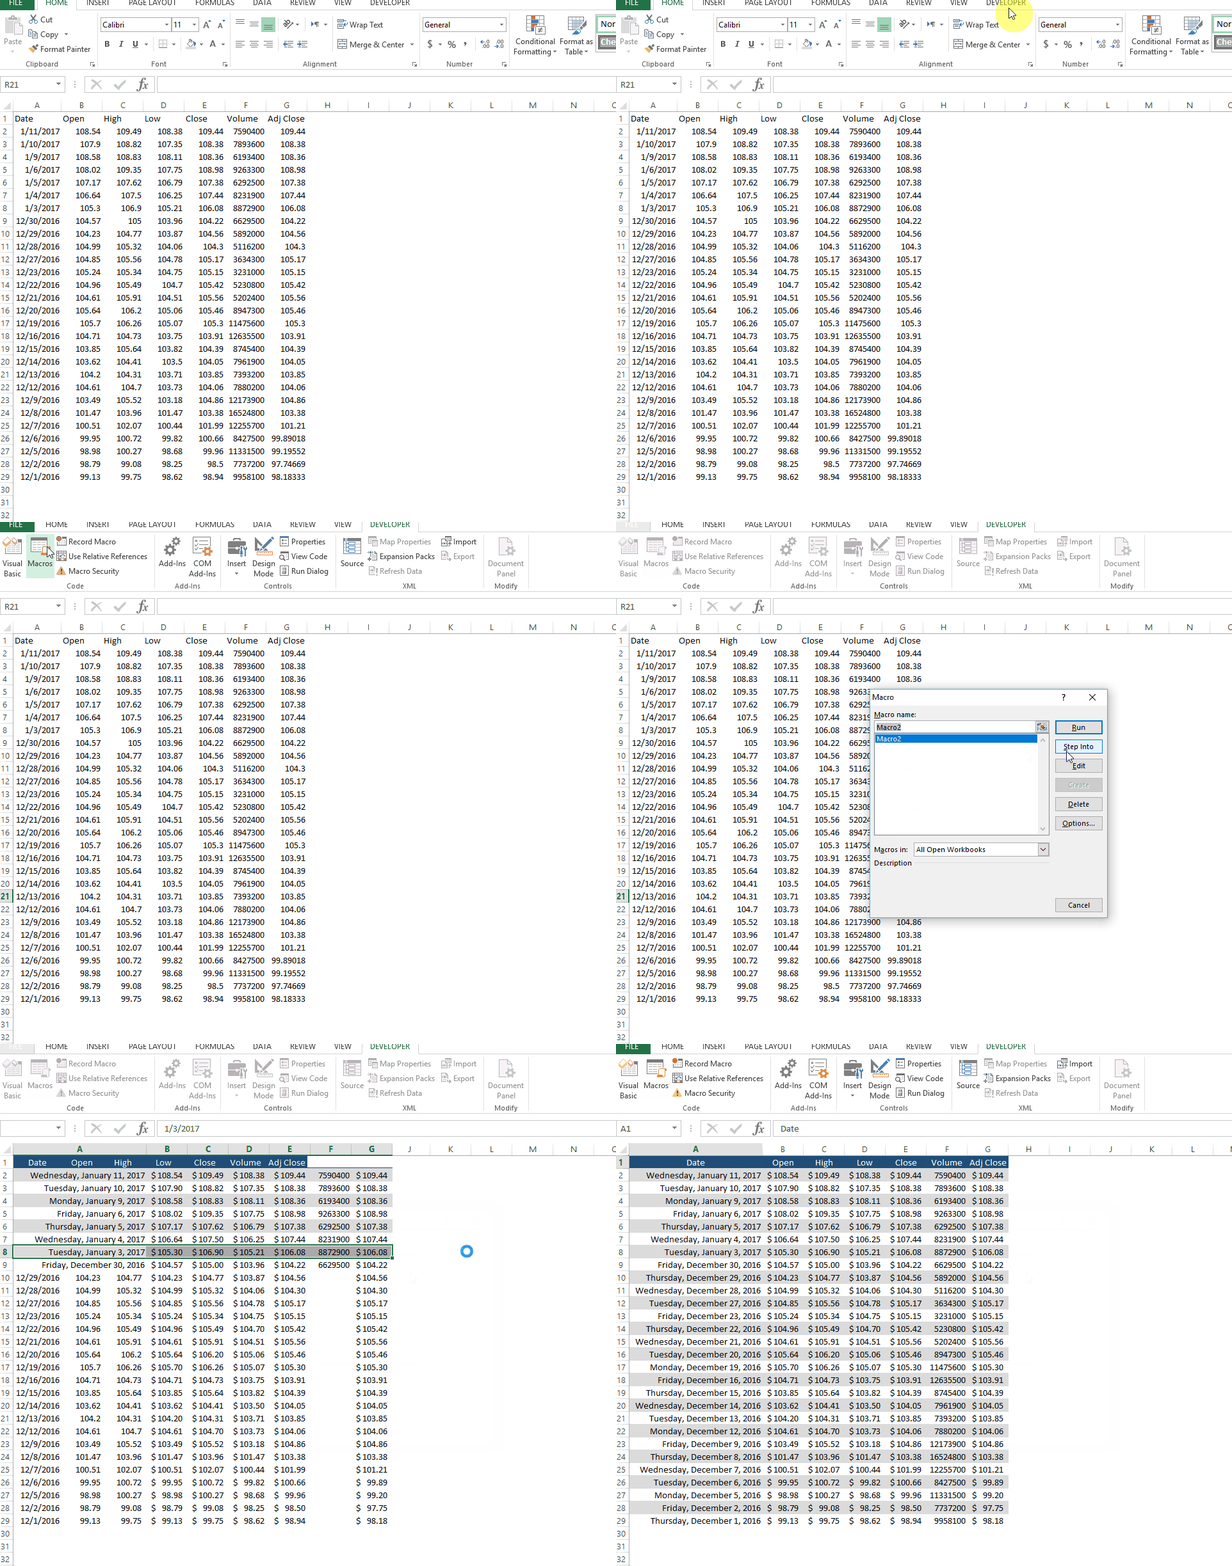
Now, this is just formatting a simple table. Imagine if you’re doing something more complex? You can literally take hours and convert them into minutes! Who wouldn’t get excited about that kind of superpower??
How to assign the Macro to a button
Once you have a Macro, you can make it easier on yourself and others who may be using your sheet to execute the Macro by creating a button and assigning the Macro to it.
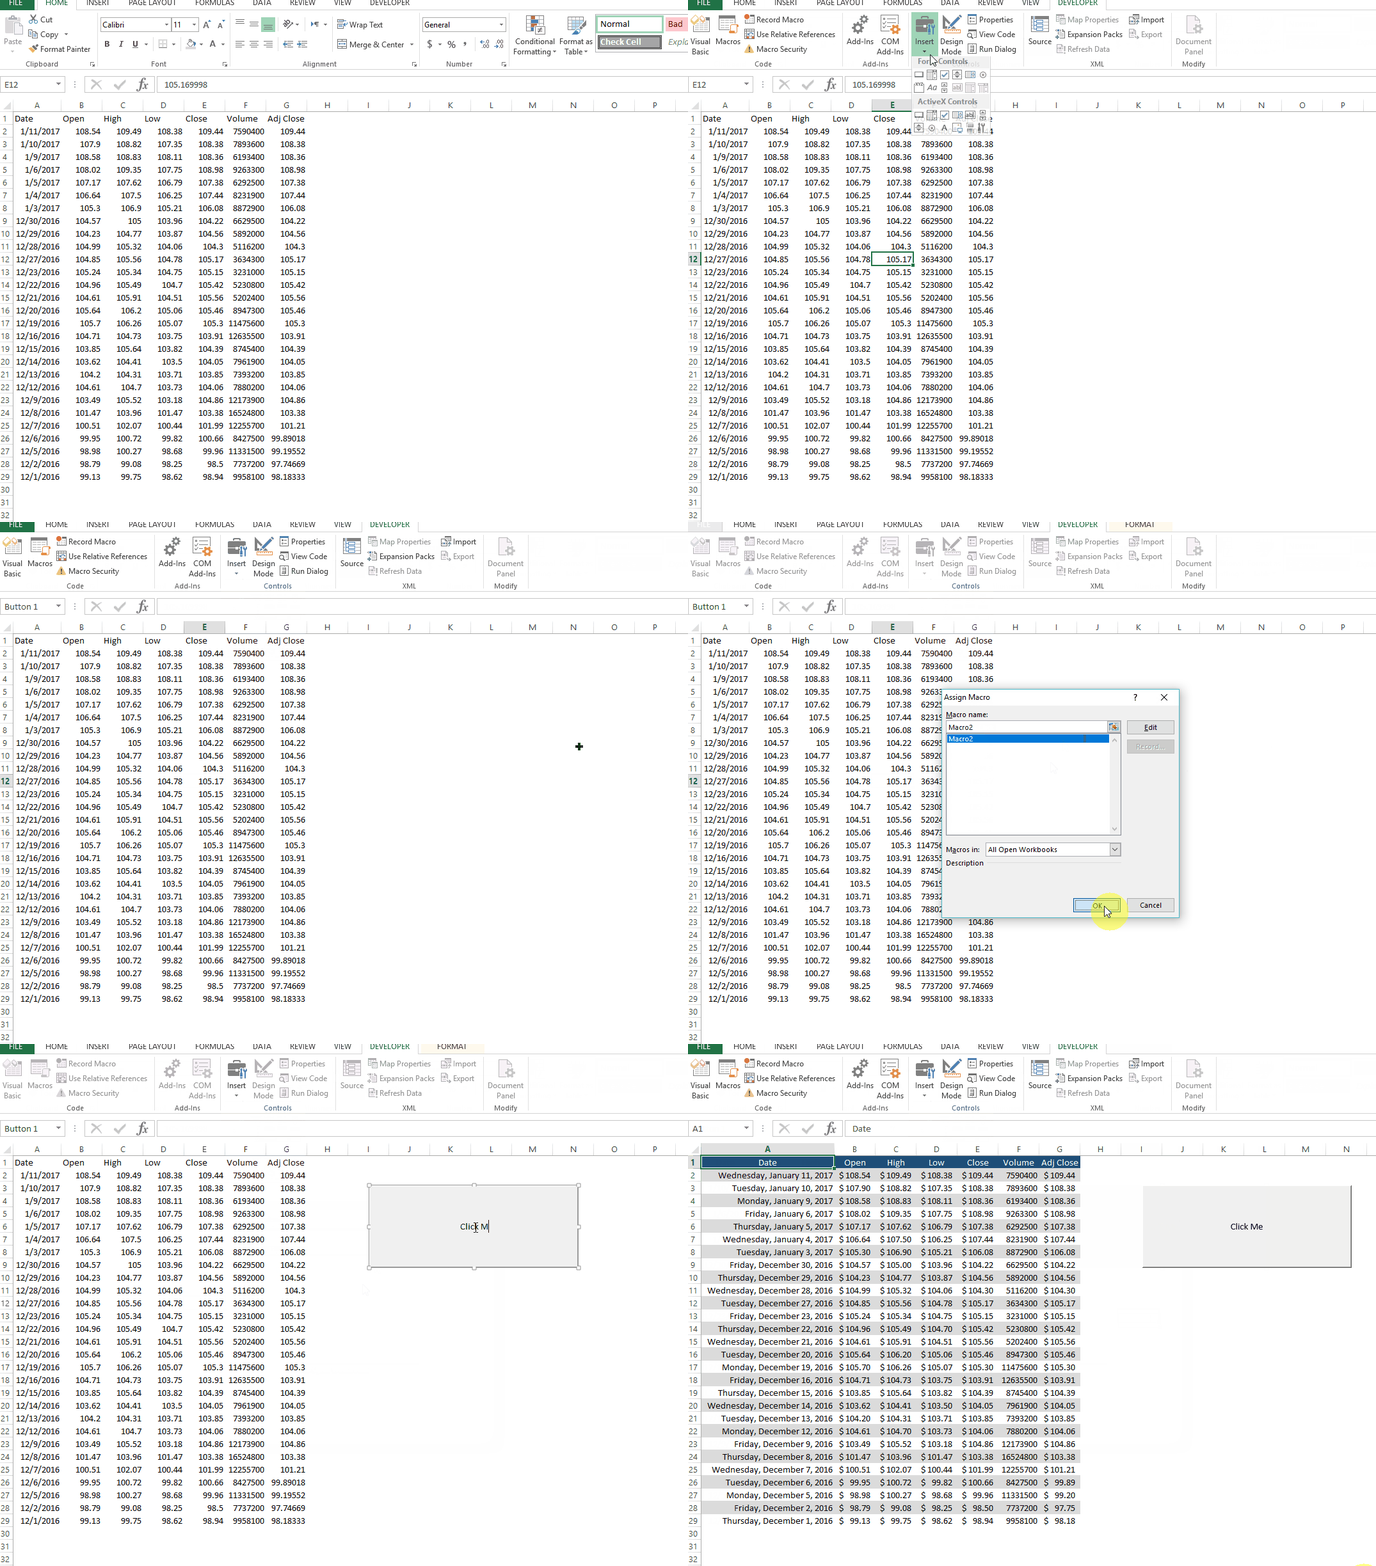
Just go to Developer Tab>Insert> and click on the “Button” icon

Then, just drag the cursor wherever you want the button to go.
Excel will automatically ask you to assign a Macro (or prompt you to create a new one).

Once you select the Macro to assign, you will be able to use the button and knock down some serious tasks!
Pop the hood to the engine with Alt+F11
Something you need to understand (and I’ll demonstrate in a second) is that when you use the Macro Recorder, Excel is recording your actions and spitting out Visual Basic code in the background.
But…
what if you want to modify the Macro?
What if you’re curious and you want to see what Excel generated?
I’ll take you to a part of Excel that not many people know about or venture to…
Just hit Alt+F11 on your keyboard (or use the Developer Tab again)

This button takes you into the realm of VBA…

This strange window opens up (pictured above), and all of a sudden you feel anxious because you ventured too far away from Excel and now you feel like you’ve reached the upside down (any Stranger Things Fans out there?)

**How I was the first time I discovered that VBA was a “thing”. Also, Stranger Things is an AWESOME show… Back to VBA
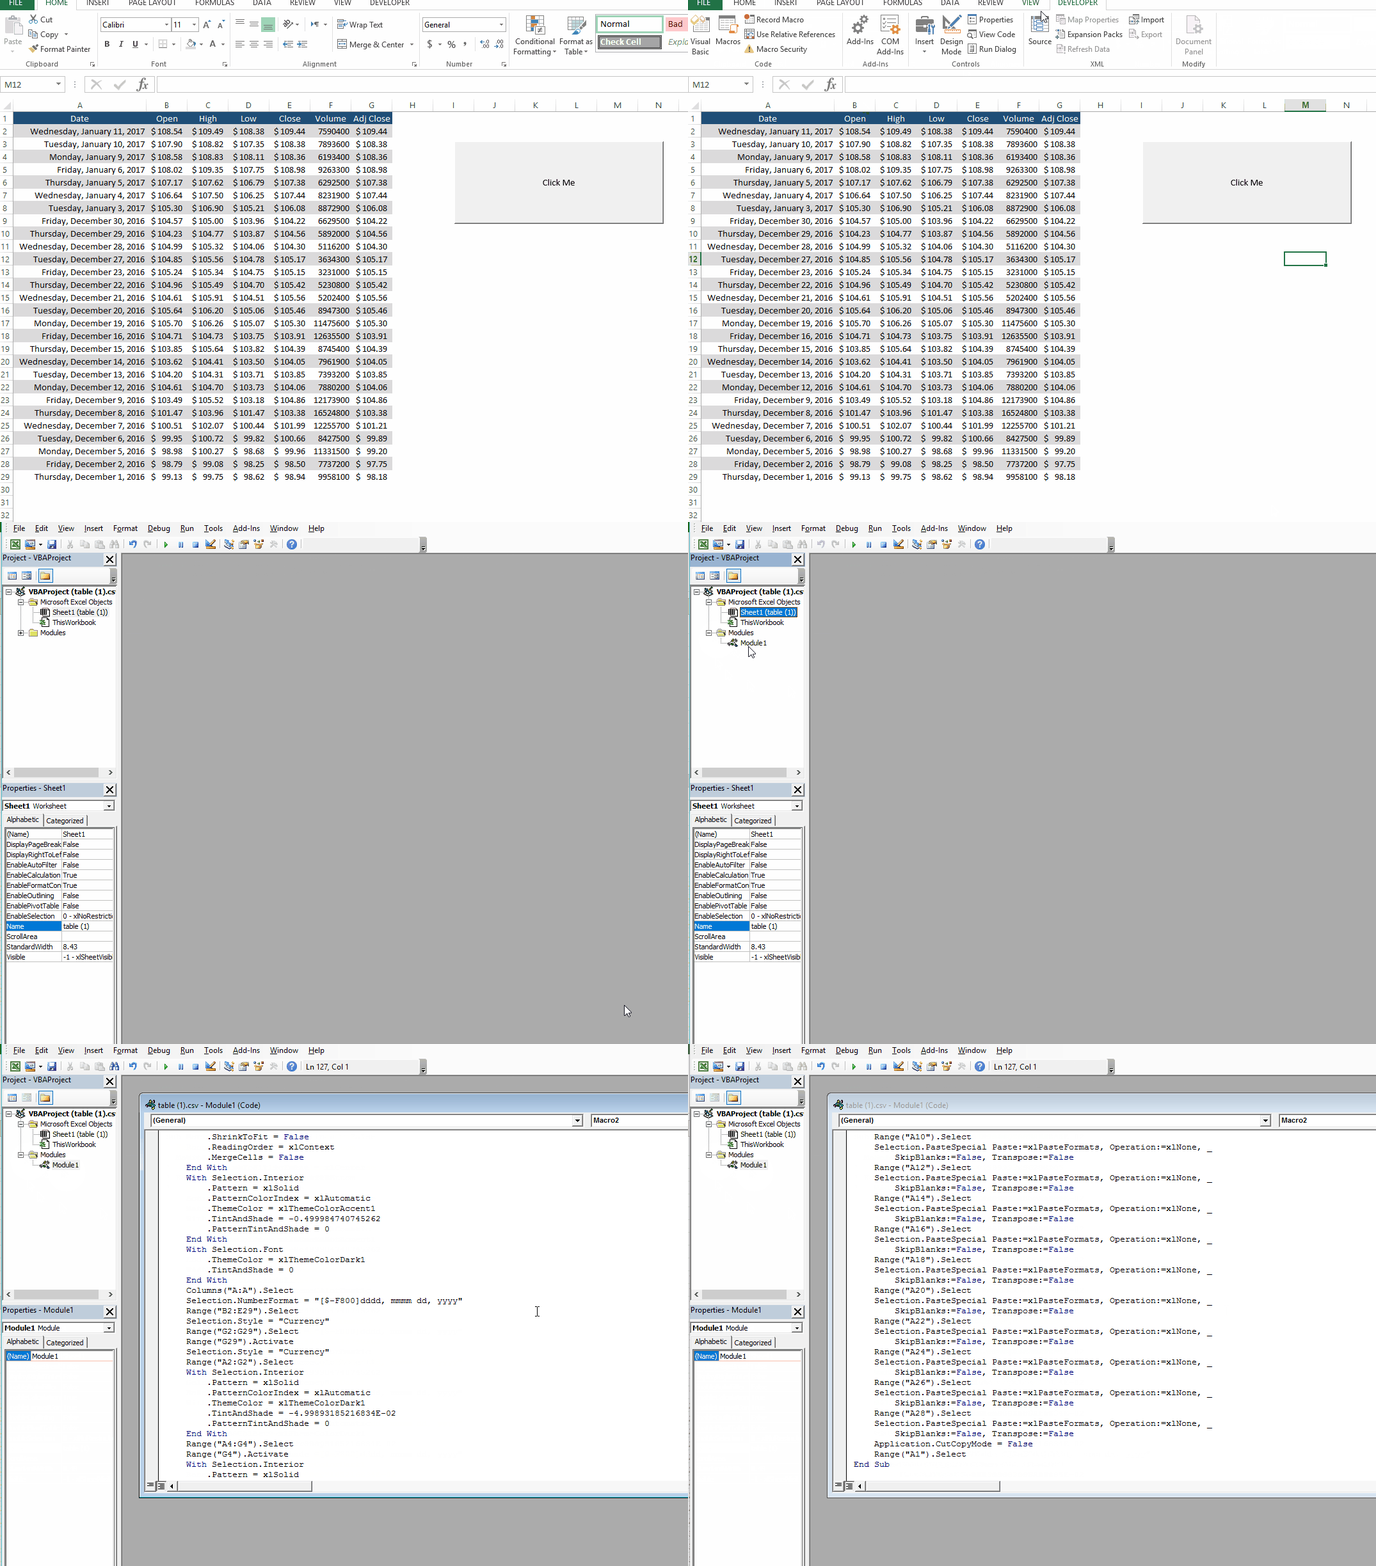
Once you’re in the editor, you can view the snippet of code that Excel spit out when you recorded your Macro.
Click on Module 1, and a window will open revealing the code snippet

Here is the code generated by my fancy table formatting we looked at earlier…

WTF?!
Yeah, exactly. If that code snippet looks similar to the picture below, don’t be alarmed. That’s normal… We’ll dive into some code later…

Here is a demonstration of how to access the VBA editor:
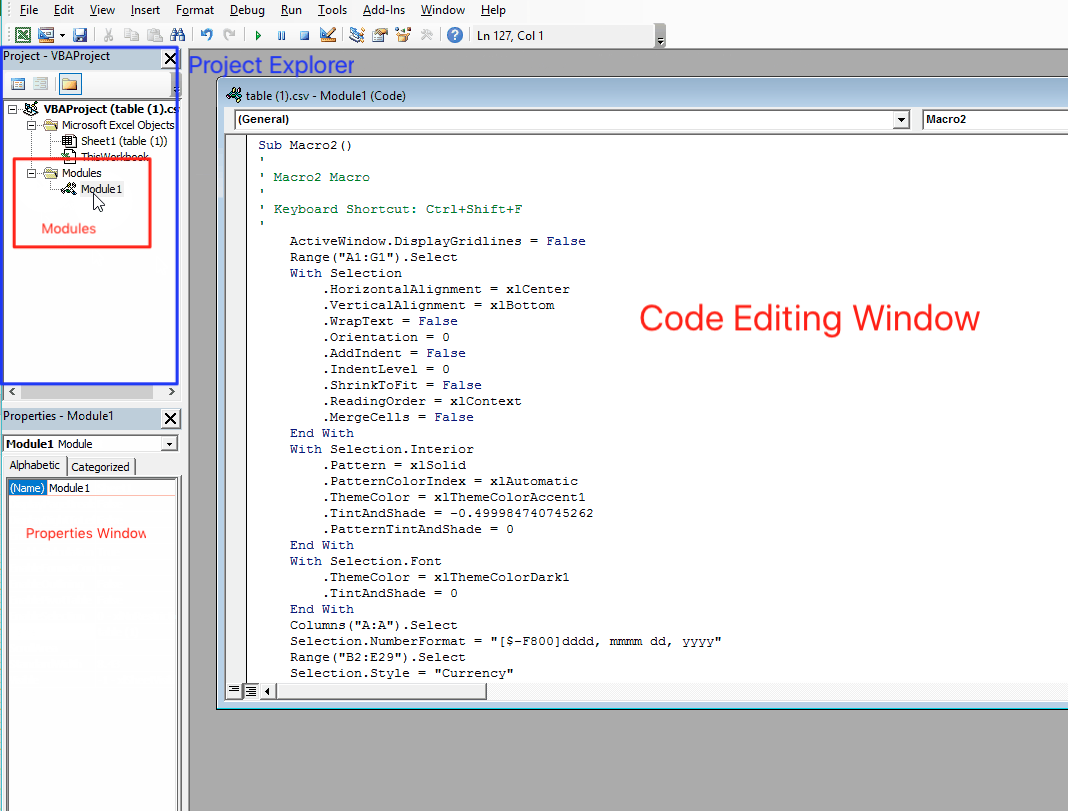
I’ll be referring to some parts of the VBA Editor that you may not be familiar with. Here is a simple map to find your way around in case you get lost:
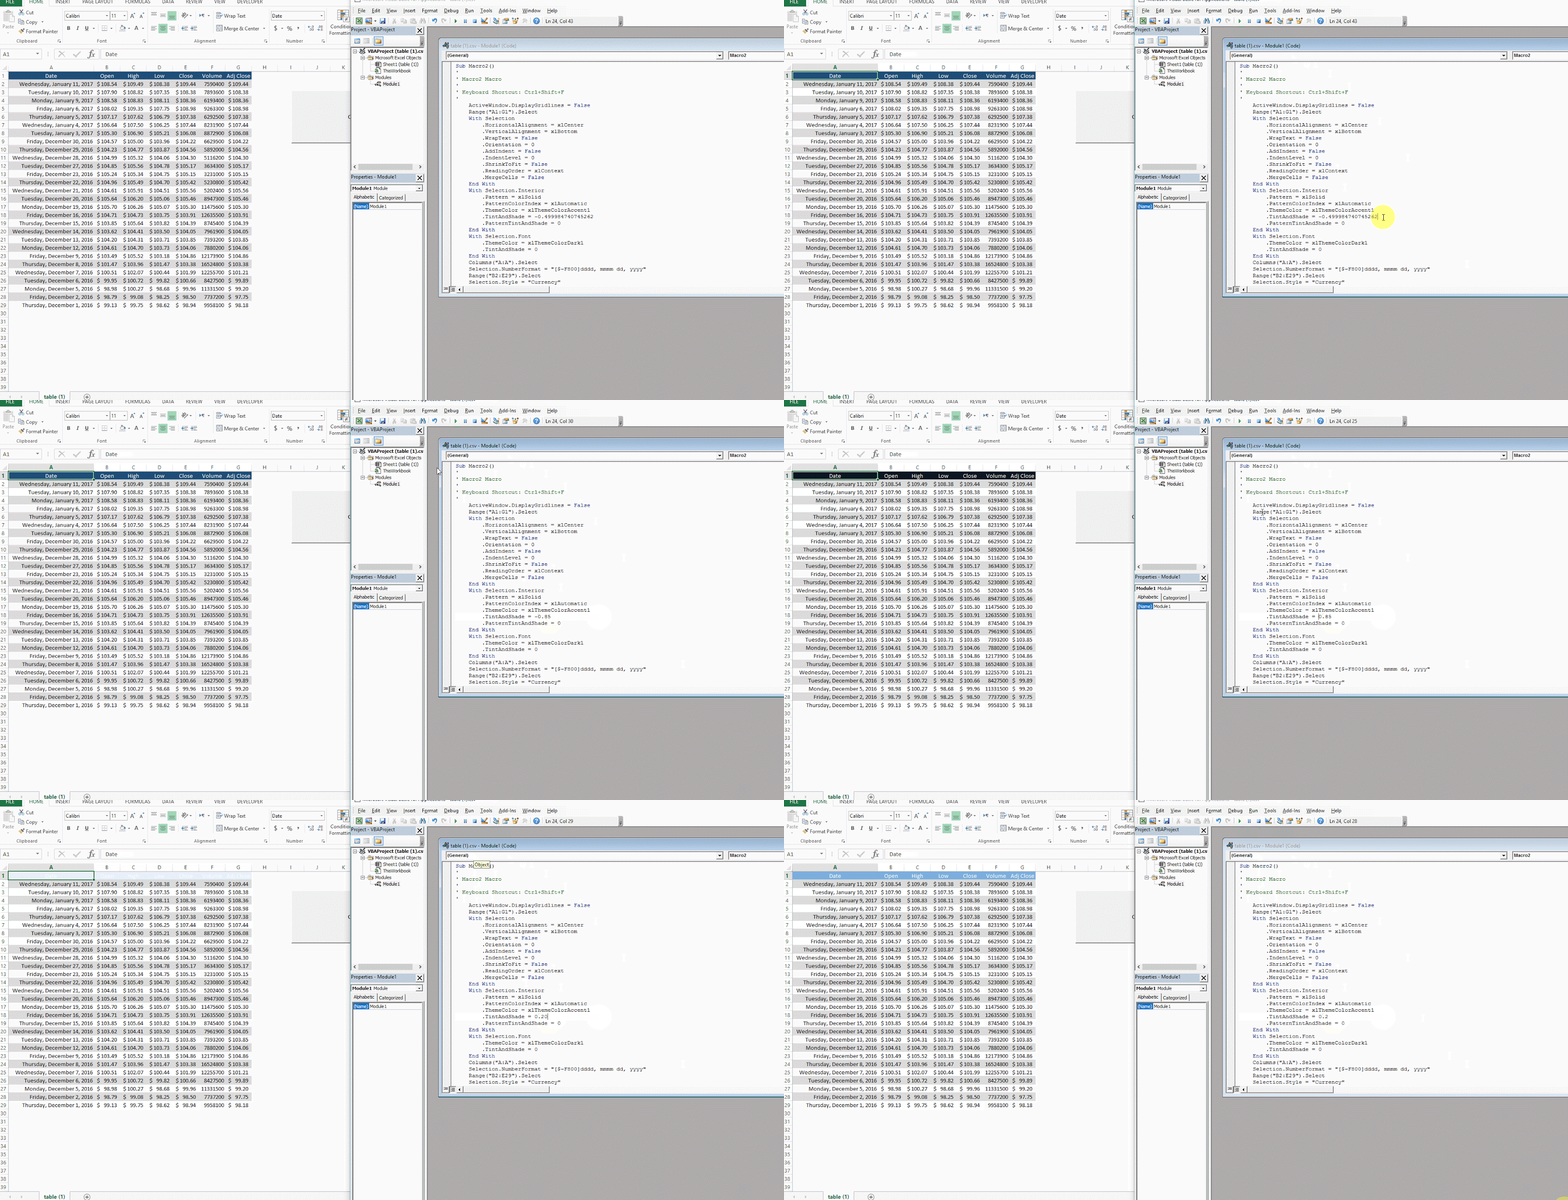
Modify Code and see the result
In the VBA editor, you can modify any code snippet to your liking. See how changing one line of code changes the shade of blue in the column headers?
VBA Code to learn: Copy and Paste Macro
Now that you’re familiar with how to use the Macro Recorder and how to modify the code it spits out, let’s implement some simple VBA code from scratch to demonstrate a few quick tasks you can automate.
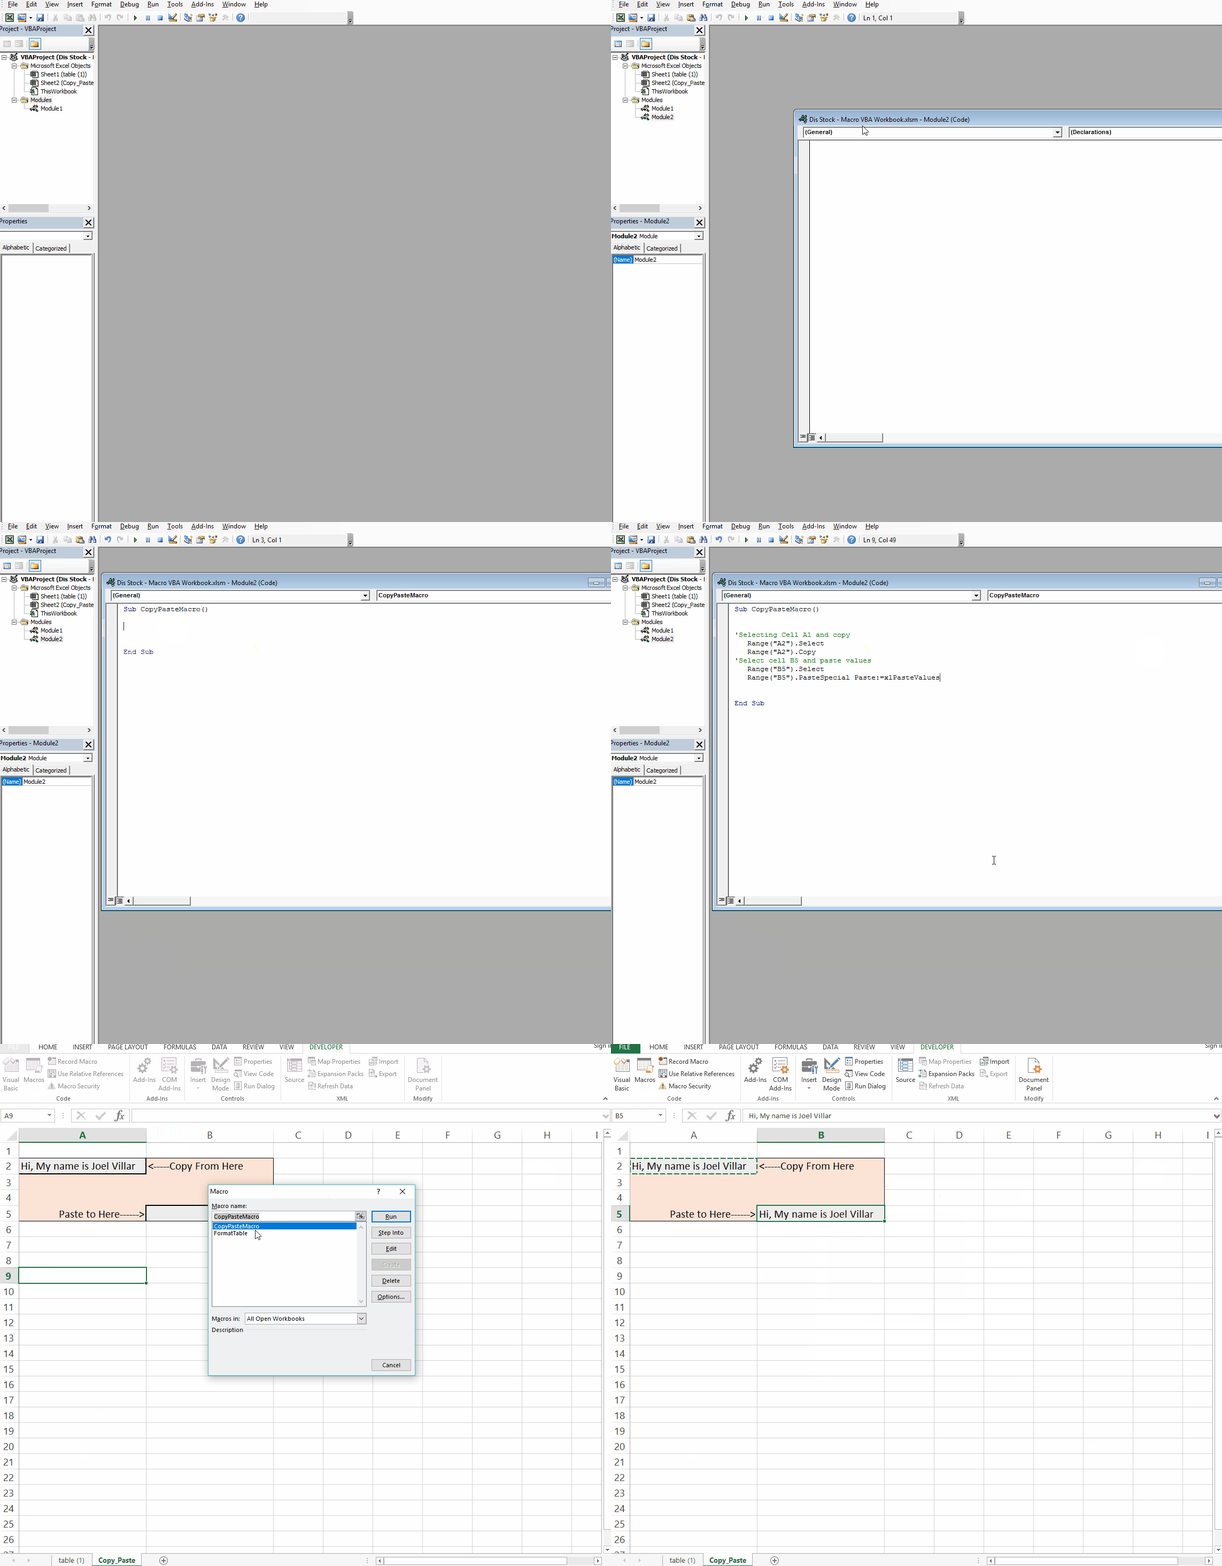
Open a new Excel sheet and hit Alt + F11 to open the VBA Editor. We’ll add a new Module and begin working from there:

In order to start writing a Macro from scratch, you must give the Macro a name. Make sure when you name your macro that you don’t use any spaces.
We’ll call our macro “CopyPasteMacro()”
Enter the following code:
End Sub

When you type “Sub” followed by the Macro name, it tells Excel that you’re about to give it instructions for executing a task.
End Sub tells Excel the instructions are over.
We’ll enter a simple Macro that copies the content of one cell and pastes it in another.
Now, type the following after “Sub” but before “End Sub”
Range(“A2”).Select
Range(“A2”).Copy
‘Selecting Cell B5 and paste values
Range(“B5”).Select
Range(“B5”).PasteSpecial Paste:=xlPasteValues
Range(“[Cell Range]”) identifies the cell (or range of cells) the Macro applies to. .Select & . Copy are actions Excel executes on those cells.
.PasteSpecial Paste;xlPasteValues tells Excel to paste values
It’s now time to run the Macro we just created and see if it actually works.

Code to learn: Hide/Show Tabs Macro
Let’s create a Macro the Hides and Shows all the tabs within the workbook (sometimes, you just don’t want anyone to navigate away from the main sheet).
Once again, enter a new Module:

Now enter the name of the Macro using Sub. We’ll call this Macro hide_tabs()

End Sub
Enter the following code:

This time we’ll do something a bit different. We’ll enter two Macros on the same Module. You do this by entering another Sub underneath “End Sub”, like this:
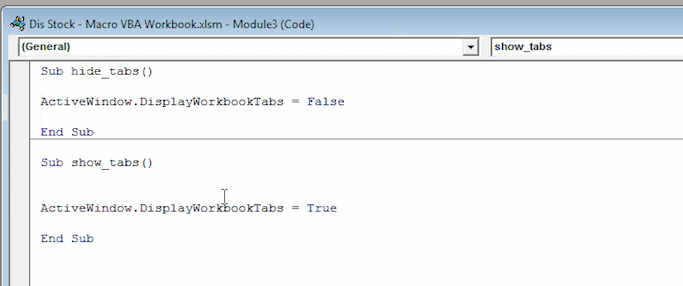
Notice how the VBA editor automatically enters a line to separate the two Macros whenever you enter another Sub command in the same module. This makes it easier for you to audit your work and not confuse the two sets of code.
Let’s see this in action:

Code to learn: Message Box Popup Macro
When you’re writing Macros for yourself and others, sometimes it’s a good idea to give the user message boxes so that they know what is going on and how to proceed.
Message boxes can take on different functionality, but the idea is the same; you prompt the user to either acknowledge an alert, give the program feedback (Yes, No, Cancel) or to warn the user when they are doing something wrong.

Whoever came up with this message box wins MVP of the idiots award…
Before I show you how to create a simple message box, there is something else you should know about VBA…
You can setup your VBA code to execute when the user takes certain actions (ie. saving the workbook, opening the workbook, clicking or modifying cells, etc.) which are referred to as Events.
To demonstrate, I’m going to create a message box and have it popup every time the user saves the workbook:
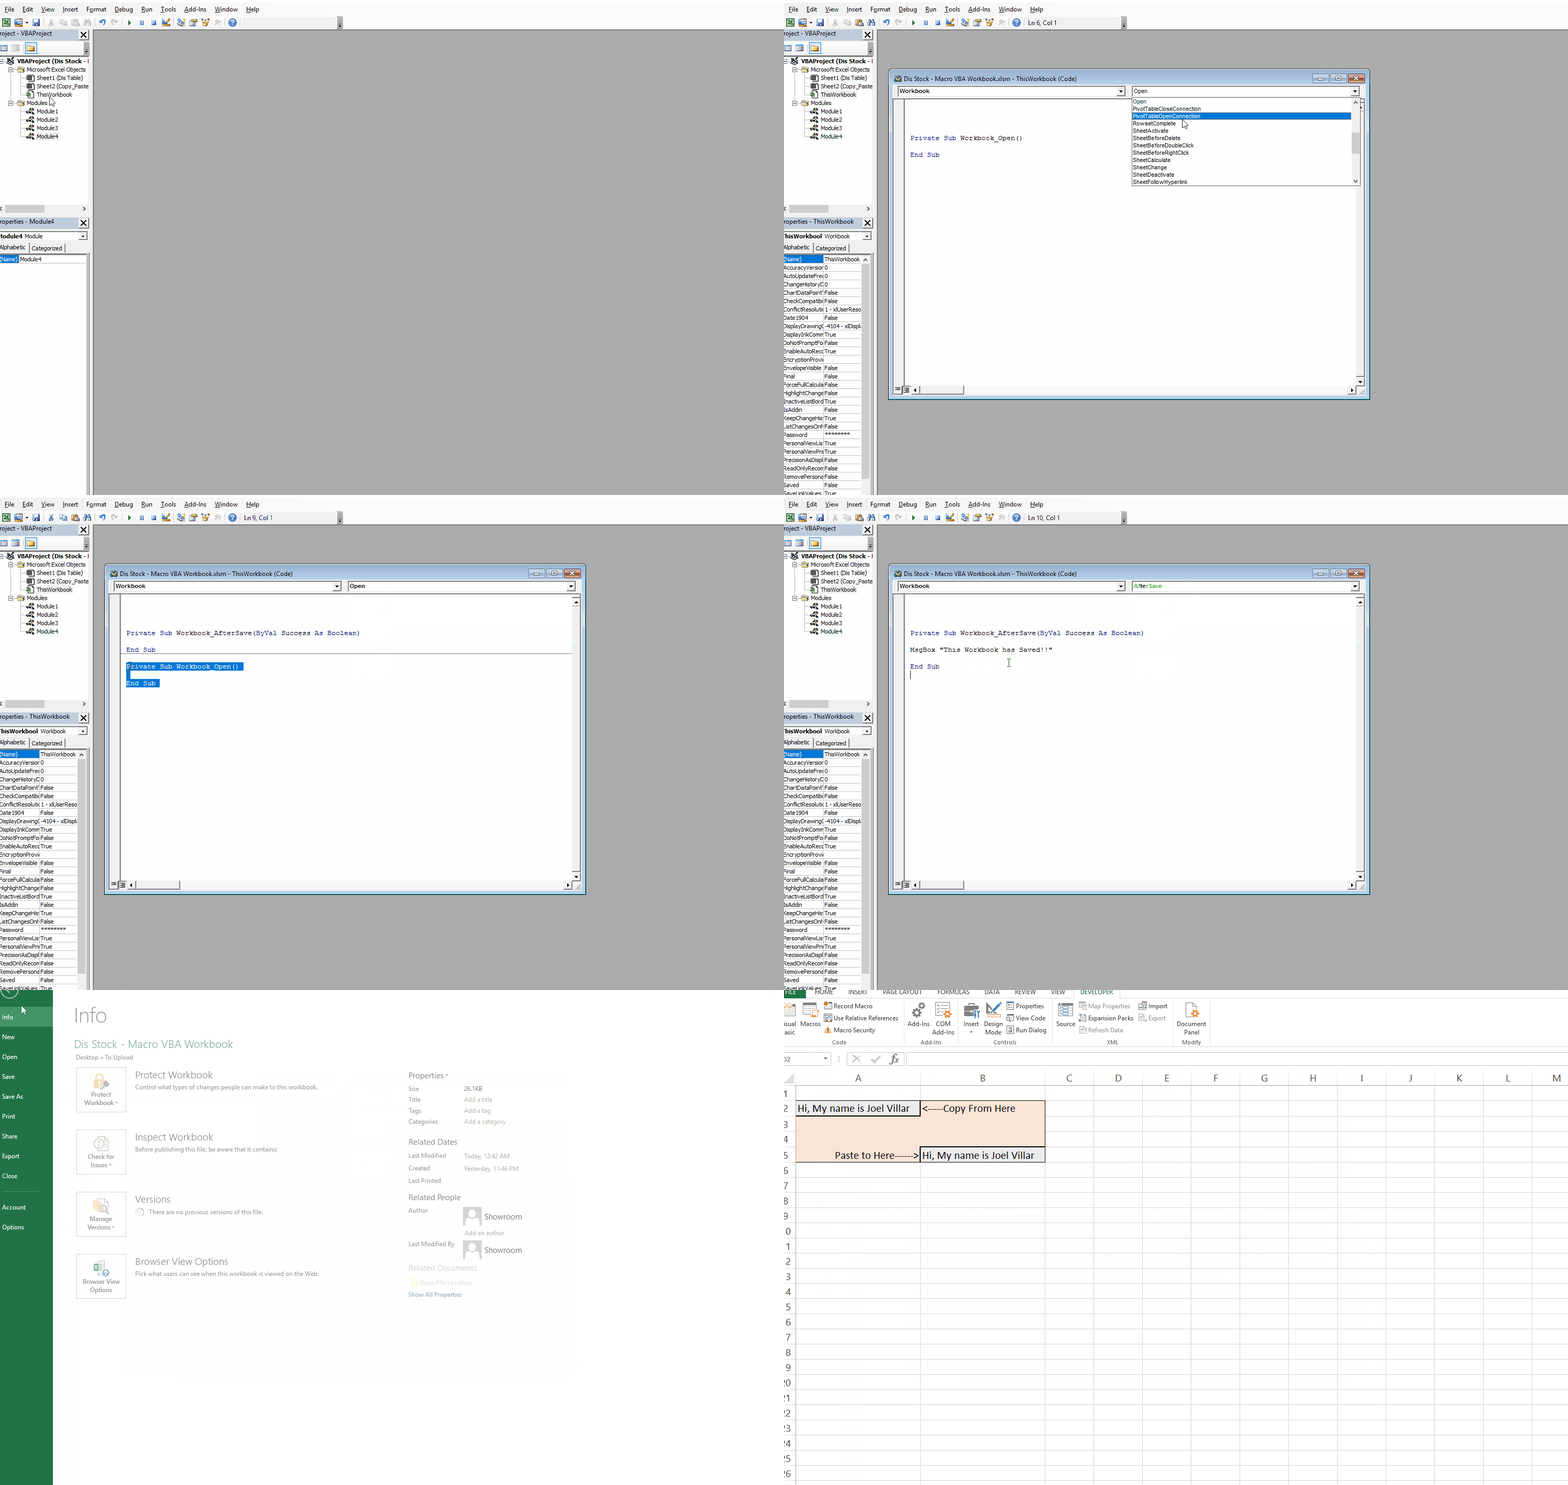
Once you’re inside the VBA editor, click on ‘ThisWorkbook”

There are two dropdown menus at the top of the window that appears. Change the first one to “Workbook”. This tells VBA to only execute the code once an action is taken inside the workbook.

The other dropdown indicates specifically which event will trigger the code to execute.

When we choose “AfterSave”, a code snippet is automatically entered into the editor. This is the specific code that tells Excel to execute the Macro when the event is triggered (aka, you don’t have to memorize this piece or enter it yourself. It’s already done).

Now, we’ll be entering the code that triggers the message box. Here it is:

And finally, here is the Macro in action:
Recommended Resources
So, now that you’ve got a better idea of what VBA is and how it’s used; what now?
First, the best way to learn is to get in there and get your hands dirty. Think about the tasks you’d like to automate to help you save time. 30 seconds here, 45 seconds there begin to add up quickly.
Experiment, test, iterate, and grow your knowledge by doing is one of the best ways to learn Excel. It takes some time but it’s definitely worth the investment.
But what if you don’t have the time? What if you need to cut straight to the point and learn VBA as quickly as possible?
I highly recommend checking out Jon Acampora’s Free video series, which walks you through Writing Your First Macro, Automating tasks, and creating user forms.
If you’ve decided that VBA is for you and you want to take the full plunge? Jon offers a premium course, the VBA Pro Course (which was featured as a grand prize to the winner of our first Excel MVP Giveaway last October), one of the best VBA courses available.
In the course, Jon goes over:
- Macros and VBA Basics
- How to use If Statements, Loops, Arrays, and how to handle errors
- How to build your own Excel apps that can be customized for your own projects or even sold online
- Deep dive into creating user forms
- And much more!
If courses aren’t really your thing and you prefer the self-study approach, Michael Alexander’s book, Excel 2016 Power Programming with VBA is a great book to pick up. It’s filled with amazing examples and easy/clear to read chapters. Definitely useful to not only learn but to use as reference material.
If that doesn’t help; Excel-Easy has a great set of VBA tutorials on their website that takes you from novice to proficient with real world examples and exercises.
In today’s modern, information driven world there shouldn’t be any excuses why you haven’t learned VBA yet. What are you waiting for roll up your sleeves and get in there!
VBA Tips and Tricks
You know the incredible benefits of learning VBA and what it can do for the future of your career, you’ve seen first hand how to record Macros and start deploying code, and now you want to take the plunge and learn as much of this stuff as you can, right?
right???
Here are some important tips you should know before you start going VBA crazy…
Macro Recorder is your BFF!
If you haven’t noticed by now, the Macro Recorder is an incredible tool that allows you to create VBA Macros without knowing a lick of VBA. Use and ABUSE the recorder, especially in the beginning of your VBA journey.
In the beginning It’s easier to record a Macro and modify the code it generates than creating a VBA macro from scratch. Don’t be a hero 🙂
Learning VBA is about being patient and experimenting as much as possible.
Debug Mode (F8)
Sometimes, things can go wrong.
I know, shocking…
Especially when building Macros. Even the most experienced VBA users make mistakes and break their Macro.
How do you know which step in the process is broken? Or, better yet, how do you see your code in action, step-by-step?
Use the Debug Mode that’s built into your VBA editor, that’s how!!
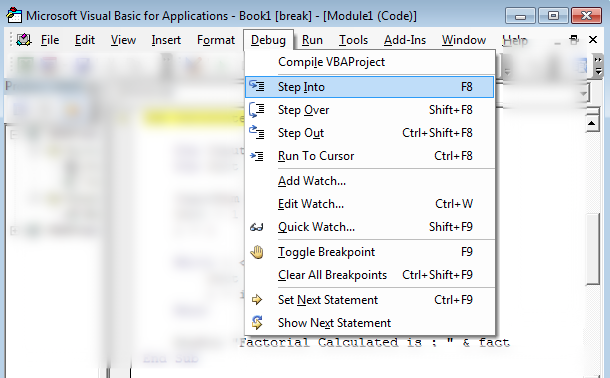
When you use Debug mode, you can “step into” your code which is a fancy way of saying executing your code, in a step-by-step, so you can see what is actually happening on the spreadsheet.
This tool alone has saved me tons of time and energy looking for where my Macro is broken because it lets me visualize exactly what’s happening.
Sign up to courses for structured learning
I’ve learned a lot of VBA on my own (and truthfully, I’m still learning a lot every day). However, sometimes trial and error may not be the quickest approach to learning as much as possible. Structured learning and having someone who can guide you can be just more effective.
Some of the best techniques I’ve learned have been by taking courses, whether online or at my local college.
If your budget allows it, sign up to a highly rated online course. There are great courses available for an affordable rate, especially on places like Udemy.com. Just remember, you get what you pay for so don’t expect a world class quality course for $5 (how can the course creator be committed to providing world-class quality for that amount?)
Break big projects into small steps and Iterate
This tip applies not only to VBA creating, but to Excel and even project management in general. If you’re like me, the power of VBA automation already has the wheels spinning in your brain of all the amazing possibilities.
Don’t worry, this is normal…
It’s also normal to look at a project you’d like to carry out and wonder if it’s too much to chew on. Sometimes looking at the overall project can be overwhelming, but if you break it down to it’s core functionality and iterate from there it will become so much less overwhelming.
It’s simple to do this:
- Figure out the basic, minimal viable product version of your automation (Maybe it’s just copying a range of cells)
- Build only this piece.
- Test it
- Move on the building around this functionality (ie. opening a file saved on your server and pasting the range in a specific location).
- Repeat until you finish the project
Save files as Macro Enabled Excel Files
This seems basic, but you’d be surprised how many times my colleagues have sent me files containing VBA in an inappropriate file format.
Saving your Excel workbook in a Macro enabled version ensures that whoever uses the workbook will be able to activate the Macro you saved in it.

Export your VBA code and import it to other files
Whenever I complete a new Macro, I usually export the code to save as a backup, and so I can import it to other workbooks. This ensures that your VBA doesn’t get lost/deleted and allows you to use it in other files.
How to do it:
Once inside the VBA editor, click on the module you’d like to export and click on File>Export File.
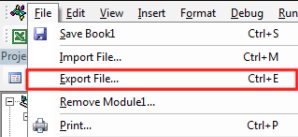
The program will prompt you to name your file and save it onto your computer.
If you’re working in a new file and want to import a Macro that can help you finish your work faster, just open the VBA editor and click on File>Import File:

Time to become a VBA Pro!
There’s still a ton to learn, but you’re well on your way to becoming a VBA-ing, workflow automating, productivity machine ready to WOW everyone at work, contribute more, and earn more opportunities!
Pretty soon you’ll have people looking at your spreadsheets like:
